
Soccer Nation - Playing (Manual)
Quick Start
To get into the game quickly:
When you see the menu entitled "Select Your Game Type", click on either the 'Soccer Nation League' or any of the leagues with a national flag next to them
Then click on the icon marked "Next Match Day" each time you see it
A simulated league season will begin, and you will soon see your first match
Refer to the relevant supporting notes within this document for a detailed explanation of how to use Soccer Nation. Selecting Game Mode will guide you through the steps to a core Management Mode game.
Installing This Release
If You Have Previously Installed An Earlier Version Of "Soccer Nation"…
We recommend that you run the setup program on the CD-ROM to update your current installation. See below for details.
If You Have Not Previously Installed "Soccer Nation"…
Put the CD-ROM into your computer
Using Explorer double click on the file called SETUP.EXE on the "Soccer Nation" CD root and follow the prompts on screen
An install wizard will now guide you through the process of installing SN onto your computer.
The installation wizard will install onto your PC and Windows system all the files required to operate Soccer Nation, including a movie player and DirectX 5.0.
You may be required to re-boot your computer to finish the installation
How To Run SOCCER NATION
To run the game:
Put the CD-ROM into your computer's CD-ROM drive
Click on Windows 95 START button
Select 'Programs'
On the pop-up program list you should see an option marked 'Crush' - click on this
A pop-up window should now appear saying 'Soccer Nation' - click on this and the game will run
Changing Screen Resolution
The game should automatically select the best resolution for your computer configuration. However, certain graphics cards may cause problems due to incorrect installation (usually by their own default install software!).
If you wish to try forcing a screen resolution, you can do this from within the game itself when launched.
What To Expect When The Game Starts
When you launch the game, you will first see an animated sequence, setting an atmosphere for the game to follow.
Press SPACE BAR to skip through this stage
At the end of the sequence there will be a short pause, while a title page is loaded.
Thereafter you will be offered the Game Mode selection screen (see below).
Game Modes
There are many variations of game mode in Soccer Nation but these can be broken down into three major categories:
Online (play against human opponents over the internet in a league system or other competitions).
In this release, selecting Online Game will allow you to log on the Crush! Server and store your details so that you can compete in the Nation Cup (when launched later in 1998) and also enter your team into the online league structure to compete in regular league competitions.
The Online game is still being updated but you can call for a connection update using this option.
Normal career game (compete in a league of your choosing against computer opponents)
There are many predefined league structures in Soccer Nation from which you can select one to compete in at this stage (or you can construct one of your own using the Custom League option - see 2.5 Custom League Editor). Simply select the country of your choice and your league structure will be the same as that country's, or play in the Soccer Nation league which mirrors the form of the online leagues.
Cup game (compete in a cup competition)
There are two types of cup on offer - the Nation cup and the Knockout cup. Selecting the Nation cup will enter you into an international competition, with qualifying rounds and a final knockout stage; the Knockout cup on the other hand will allow you to compete as part of a 32 team competition, with victory in the final qualifying you to play against the Soccer Nation Dream Team for the ultimate challenge.
Icons And Navigation
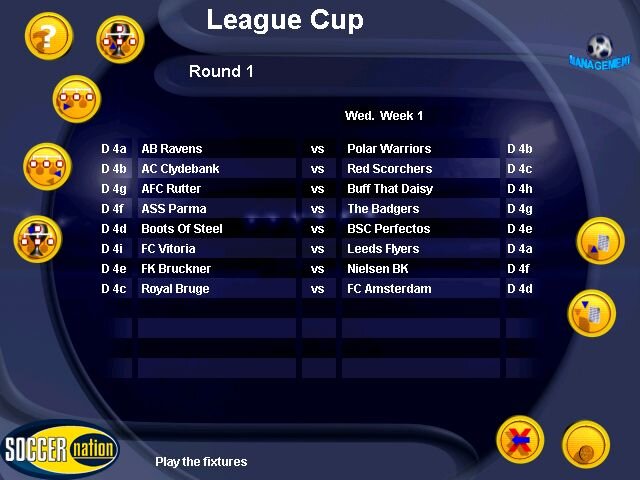
You will find two types of front-end screen which you use to navigate your way around the game - the Navig Football which you use to make key management game selections, and the usual "Soccer Nation" front-end (see below).
Your available options at any point in the game (unless you are playing a match fixture) are shown as icons around the centre-window border.

In the top left hand side of the screen you will see an icon with a question mark upon it. This will activate the game HELP facility and is available on almost every screen in Soccer Nation. It is active in this release.

In the lower right-hand corner you will see an icon with a tick upon it - this button will appear on almost every screen in Soccer Nation.
Always use the left mouse button when clicking on an icon.
The typical screen layout is as below:
If you move the mouse pointer over an icon, a description of the icon's function will appear on the information bar at the bottom of the screen. This information can be turned off at any point by clicking on the Help icon always located at the top left of the screen.
Selecting Game Mode
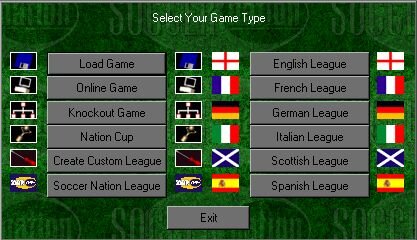
When you start to play Soccer Nation, you will see a title screen, and then the Select Game Mode menu (above).
To choose your game mode simply select the option of your choice, and click on it. There will then be a short pause while the database is loaded and configured for that option, and you can then proceed with enter your details - manager name, team name, etc.
Custom League Editor
The Custom League Editor has been designed by Crush! to allow users of Soccer Nation to create almost any league system imaginable. Create your own leagues and alter the variables that define the league structure and its rules. Once you've created a new league structure this can be competed in, but you can also save it out to play in it again at a future date or modify its rules.
To begin editing your new Custom League, or to play or edit one you have previously created, simply select Create Custom League from the Select Game Mode menu. You can then select from one of these three options:
New League
This option allows you to define the variables for a new league structure including selecting the nationality of the teams, changing the shape of the league, changing the points for a win, and altering the promotion and relegation rules (for a full list of the options available here refer to Custom League Main Menu below). Clicking on New League will take you to the first selection box with which you can begin to define your league (see ‘Number of Divisions’, below).
Edit League
This option allows you to change the variables of a league that has already been created using the Custom League editor. It may be one of your own, or it may be friend's or even one downloaded from the Internet, but to edit an existing league simply select this option and then direct the computer to the location of the league. All custom leagues have the suffix "lge" to identify them and are usually saved in C:/Program Files/Crush!/Soccer Nation/Leagues. Here you can also find the predefined league structures that come with the game and modify these if you wish to.
Play League
Selecting this option will allow you to compete in a league you (or someone else) has created in the Custom League editor. Direct the computer to the location of the league you wish to play in, and when it has loaded this will take you directly to the Select Division screen so that you can select your team.
Number Of Divisions
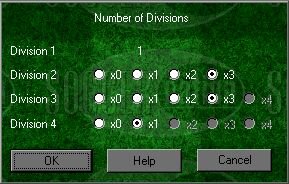
When you see the above screen, you can select the number of divisions in each "tier" of your league structure. Click the button next to the number of sub-divisions you want within each tier.
In most countries national league systems there is only one division at each tier level - i.e. one premiership, one division one, one division two, etc. But in Soccer Nation you are able to create more than one sub-division at each level (with the exception of the division one tier), with the following maximums imposed:

In addition the name of each of these sub-divisions can be changed using the Divisional Options menu (see ‘Divisional Options’, below).
The numbers at each division level are a multiplier, and the number of divisions in the tier above will be multiplied by this number to give the new number of sub-divisions for the next tier.
For example, selecting "x2" for the Division 2 tier will multiply the level above (1 division) by 2 giving 2 sub-divisions in that tier. Selecting "x3" for the next level (Division 3) will multiply that 2 by a further 3 giving a total of 6 sub-divisions for the Division 3 tier. And finally selecting "x0" will multiply that 6 by 0 giving 0 sub-divisions in the final Division 4 tier. This gives a 1-2-6-0 structure (where the numbers show the number of sub-divisions at tier levels 1, 2, 3, and 4 respectively). This is an easy shorthand way to refer to a Soccer Nation league structure and give its size at each level.
When creating a new league tree from this menu it is important to note that it is essential to have one division one, but below that you are able to select "x0" as one of your options. This will cause the level where "x0" is selected to contain 0 sub-divisions, but also every tier below that will also contain 0 sub-divisions since 0 multiplied by anything will be 0. To indicate that no further selections will be possible below the first level containing zero sub-divisions, the options will be greyed out. It is therefore easily possible to create a 1 division league structure (1-0-0-0) by selecting "x0" for each divisional tier. This would create a league with no promotion or relegation possibilities.
Since the number of sub-divisions for each tier has a maximum possible size, any illegal choices will be greyed out preventing you from choosing them. If you wish to have more sub-divisions than is allowed in a lower tier then you must reduce the number of sub-divisions in a higher tier.
Once you have decided on the shape of your league tree, select OK. Cancel will return you to the Select Game Type menu. Help will give online help describing the features and function of this menu in case you forget. This help option appears on all the screens within the Custom League editor providing easy access to prompters and pointers regarding building your own league.
Custom League Main Menu

The Custom League menu is essentially split into two portions - the upper portion displays the structure of your custom league for each level (here a 1-2-2-0 structure) from where you can access customisation options directly related to each created sub-division, and the lower portion displays the options available for more general customisation of your league. To return to the main menu at this point select Exit. Your league will not be saved.
Click on a button to access the option (for example, click on an available division or sub-division to set-up the rules for that sub-division - see Options, below).
Number Divisions
This option will give you access to the Number of Divisions menu again (see above) allowing you to modify the shape of your league tree again if you are unhappy with the number of divisions present.
Inter League Nations
In addition to the league structure you are creating, there are 6 other foreign leagues containing teams against which you will play Inter League matches. Each league contains 6 teams and you can modify the following variables associated with these league and their teams using this option:
Team name
Stand names
Stadium name
Manager name
Team nationality
To edit a league simply select the number of the league from the initial menu that pops up, and then click Edit next to the team you wish to alter.
Help is again available should you need any pointers. The Edit option will take you to a dialog box identical to the Edit Team one with the exception that the Team Info and Kit Editor screen options are not available and will be greyed out. To view the nationality of the team and change it simply select the Nationality button and edit the boxes in the usual Windows manner.
League Rules
The League Rules option allows you to change the following variables for your new league:
Cost of a cup final ticket (between 1 and 50 credits)
Cost of an Inter League match ticket (between 1 and 50 credits)
Number of points awarded for a win in a league match (2 or 3)
Nationality
This option will allow you to change the nationality of all the teams within your new league, so you could create, for example, a Swiss league, a Japanese league or even a Ukrainian league.
To select a different nationality click on the down arrow tab next to the current one and select a new one from the pull down list. You can alter the nationalities of individual teams via the Edit Team dialog box on the Select Team screen once you have created your league; and you can alter the nationality of Inter League teams via the Inter League Nations option) on the Custom League main menu.
Cup
The Cup option displays the names of all cups that will take place as part of the league structure you have created, as well as the play offs that will decide who is relegated or promoted at the end of each season. The number of play offs will be decided by how you have configured your promotion and relegation rules (accessed from the divisions directly - see Divisional options). The following information is displayed to help you:
Number - the number of the cup or play off out of the total number
Rounds - the number of rounds over which the cup/play off will be played
Type - the type of "cup" where LWC is League Winners Cup, CWC is Cup Winners Cup, ILC is Inter League Cup, LC is League Cup and PO is a play off
You can rename each Cup to a name of your choosing, including the play offs, and this will be reflected in the game once you have started your management career.
If you do not want a particular cup to take place in your league then simply untick the on/off box. However, since play offs are generated from the Divisional Options menu with the Promotion and Relegation options, they can only be turned off from there and not using the tick box. The structure of each of the cups is predefined and cannot be altered by you.
Finally, you can see a total list of all the play offs and their associated data using the Play Offs button.
Play Offs
This menu option will display each play off that has been set up in your custom league and those divisions taking part as well as the number of rounds over which it will be played. The more divisions involved, the more rounds will be required to decide the promotion and relegation spot(s). The division from which the team(s) will be relegated will always be displayed first and the division(s) into which they will be relegated will be displayed secondarily. The names of the play offs as entered by you (or their default names) will be displayed here. For a description of the structure of different play offs see the Divisional Options section.
Load
The load option allows you to load in a custom league structure previously created using the editor from the source you select, either to play it or to further modify it.
Save
This option will save your current custom league structure to hard disk under the filename of your choice when you are ready. It is advisable to do so before clicking Play.
Help
A Help button will appear on all the screens in the Custom League editor, including this one, and provides a summary of the information contained in these notes to remind you of the available features and their function.
Play
Clicking on Play will construct the custom league with all its rules as defined by you ready for play. If any illegal entries are found during this process which would cause anomalies during play, you will be notified of this fact and directed as to how you can correct them. It is advisable to save your league before progressing in case you wish to modify it or compete in it using a different team again in the future.
Divisional Options
By clicking on one of the divisions displayed on the main Custom League menu you can access this divisional options menu which will allow you to attributes relating directly to the division you have selected. Sub-divisions not available will be grayed out. The following variables and data can be altered:

The name of the sub-division clicked on (this will be reflected in the game wherever "Division" is displayed)
The number of teams in the selected sub-division (minimum 10, maximum 24)
The number of games played against each side in the league during a season (1, 2 or 4)
The base attendance figure for matches played in this division (alters according to the division)
The ticket price for a league match
The commercial modifier by which figure all the finances in this division will be multiplied (altering this will affect the weighting of the amounts of money made between divisions)
The base running cost for a team in this division (differs according to division)
Additionally, Promotion and Relegation options allow you alter the rules for promoting and relegating teams in the selected division at the end of each season. If there are no divisions above the one selected (for promotion) or none below (for relegation) then these options will naturally be greyed out.
Promotion and Relegation
Each sub-division within your custom league structure can have its own promotion and relegation rules and these can be determined from this menu:
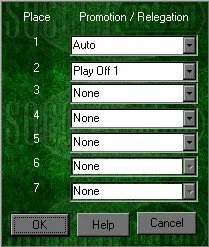
The same menu is used for both the relegation and promotion setups, but the Place numbers displayed will change accordingly - for promotion it will show the top of the table, and for relegation it will show the bottom of the table. The Place value refers to the position of teams within the league table for the division you have selected, so when editing promotion and relegation for that place you are altering what will happen to the team who finishes in that spot at the end of every season. Naturally, if you have selected a division with only a few teams (e.g. 10) then certain places within the division table will not be accessible and the buttons controlling these will be greyed out (as above).
The following options are available to decide how a team moves at the end of a season by clicking on the tab at the end of each line and selecting from the pull down list:
Auto - automatic promotion or relegation (from the current divisional tier to the one above or below respectively)
Play off - the team that finishes in the position selected will go into a play off (number 'x' where 'x' is the next available number, starting from 1) and compete against any other teams who also have a promotion/relegation play off with the same number
None - any team finishing in this position will neither be relegated nor promoted (this will be the case for the majority of teams in the middle of a divisional league table in normal football)
It is essential to make sure that the number of teams going up from one divisional tier does not exceed the number of teams coming down from above. This is more complicated when the number of sub-divisions in both tiers is not equal, but a simple way to check if this is correct is to Save your league and select Play from the main menu. If there is an imbalance you will be informed of this fact straight away and prompted to correct it before you can proceed. It is therefore wise to adjust promotions and relegations as the final piece of your league editing.