Soccer Nation - Team Management (Manual)
Careful management of your team is at the heart of SN - once you have selected a team, your objective is to manage them so they get to the top of division one or win the competition.
You will achieve this objective through a mixture of careful team selection and training, as well as timely commercial decisions -- the purchase or sale of players, the upgrading of your home stadia etc.
The major part of Management is LEAGUE PERFORMANCE - here you will play in a league division against between nine and twenty three other teams. All teams play each other within a division during a season. The team with the best overall performance will get promotion to the division above, the poorest performing teams will get relegated to the divisions below.
League fixtures typically occur weekly.
Running alongside these fixtures in the league games are COMPETITIONS - tournaments in which your team will take part. These take the form of knockouts - TEAM A plays TEAM B - the winner plays TEAM C etc., the same as the Knockout cup. Teams in competitions are picked from the overall league rather than any one division.
Competitions occur on a different day during the week to league fixtures, and you only play if your team is still unbeaten.
Game options
From the Select Game Mode menu choose either to continue a saved career with 'Load game' or to start a new career by selecting the league structure your wish to compete in, or create your own. Alternatively you can elect to compete in one of the two cup competitions - the Knockout or the Nation Cup.
A saved game will continue at whatever point in the season you had saved that game session and will go straight to the navig menu so that you can continue. Otherwise the first screen you come to will display the league structure you have selected:
Selecting a Division
You will see the LEAGUE STRUCTURE screen. This is a pictorial representation of the league 'tree' that you are playing within.

Click on the division you wish to start in
Click on DONE (tick in bottom RHS) to continue.
Select a Team
You will see the SELECT TEAM screen. The division you selected is shown as default. To select a team, simply move the mouse pointer next to the button in front of the team name and a 'tick' will appear to confirm your selection.

For ease of use, using the icons in the top left hand corner of the screen allow you move through the league tree to select a different team from a different league if you prefer.
If you click a piece of information, you will be able to edit it to change your team name, ground name, stand names and manager name.

You also have quick links to other screens from the dialog box options - the Team Screen and the Kit Editor.
Selecting Nationality will allow you to change the nationality of your team.
Click on DONE (tick in bottom RHS) to continue.
There will be a short delay while the database is prepared on your hard disk drive.
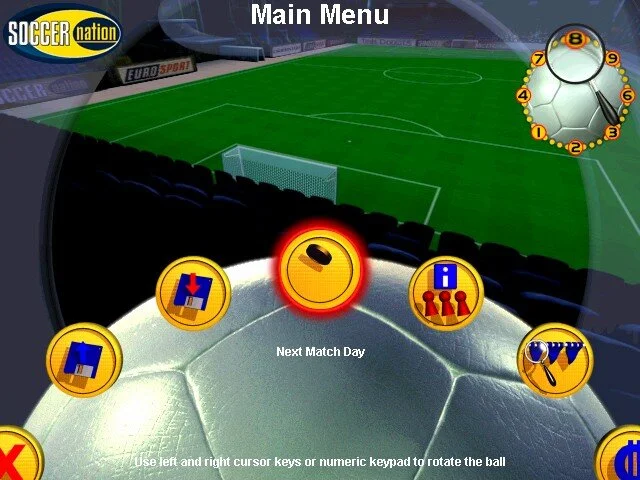
The Navig Football (main Menu)
Next you will arrive at the Navig Football which operates as the main menu for the management game.
Select the NEXT MATCH DAY icon which is the default.
Press RETURN (or click mouse) when this icon is centre of your screen
The football rotates left or right (using cursor keys) to show further options
Play continues with a dialog box telling you what the computer simulation is calculating - typically the day of the week, the week number and the season name.
How To Use The Navig Football
The football contains all the major management options arranged on the outer-side of the ball, and the user can rotate it left or right. This turns the football, and so changes the icons (options) available.
In the top right-hand side of the screen is an overview of the football showing relative location of the icons (options), and the shortcut keys - these are numbers on the numeric keypad.
The icons (options) are arranged in logical groups of functionality.
To select an option manoeuvre the ball so that the icon in the centre represents the option you require. The currently selected icon is the one in the middle of the screen, and is enlarged and labelled to illustrate it is available for selection. It also has a slight 'halo' around.
To proceed with this option click the left mouse button or press return.
To manoeuvre the ball use the cursor keys or move the mouse.
To enable faster navigation, you can jump quickly to selected key options on the ball using the numeric keypad. The key options and the associated keys are as follows; the football will automatically spin around to the option of your choice when you type the appropriate number.
8 Next Match Day
9 League Table
6 Manager Info
3 Club History
2 Video Wall
1 Team Practice
4 Formation Editor
7 Scout Search
Time Passing
When you select 'Next Match Day' you are telling SN to progress the management simulation one match day of the season (or the next significant event date as far as your club is concerned).
For example, if the current simulation date was Sunday Season 2 Week 2, then the simulation would progress to the date when something significant next happened in your league that affected your team.
Thus, it may stop at Monday Season 2 Week 2 - the very next day, when there may be some injury news you need to be aware of. Or it may not stop until Wednesday of that week, when there may be a cup fixture you need to be aware of.
The current simulation date is shown on the notepad that appears on screen
Matters that will occur during time passing include:

Injury status for members of your team
Notification of offers from other clubs for footballers on your team
Notification of acceptance or rejection of offers you have previously made to footballers in other teams
etc.
Each of the above will appear in a familiar Windows '95 dialog box.
Click on OK to continue from these dialog boxes
Alternatively, there will be fixture information, which is displayed on the Current Fixtures Screen. This will contain either fixtures in which your team will play, or other fixtures in the league for your information.
Current Fixtures Screen
This screen shows us the current fixtures for the current simulation date -- these will be either a cup competition or league cup game. You will know which by the title, 3rd row down on the top right hand side.
If your team is involved in a fixture, it will be highlighted in red.
The arrows in the top left hand side allow you to review through the other divisions or competitions (if any) that also have fixtures on this date
Icons on bottom right hand side allow you to move up and down the fixture list or to exit from this screen
Click on a team to see the Team Screen and that team's details
Click on DONE to proceed
If you have a fixture to play today, you will proceed to the pre-match screen. Otherwise you will proceed to the Classified Check Screen (below).
Classified Check
This screen shows us the results of today's fixtures that do not involve your team.
The arrows in the top left hand side allow you to review the results in the other divisions or competitions (if any) that also have fixtures on this date.
Icons on bottom right hand side allow you to move up and down the fixture list or to exit from this screen
Click on DONE to proceed
You will return to the Navig Football.
Pre-Match
We are about to play a fixture! This screen shows us the name of the ground that the game will be played at (beneath the screen title).
Next to this is the current date, in the form day, week, season (e.g. Saturday.1.1 means Saturday week 1 season 1; seasons numbered from the time when you took control of the team)
Beneath this is the name of the home team, and below that the name of the away team.
The icon at the top left hand side of the screen (next to the help icon) is the Management Editors link which will allow you access to match related options.
Under each team name is some text to indicate the control method for each team:
'MANAGER' play - you watch your team play the match and manage from the 'dug-out'. You can make decisions during the match that affect playing style, substitutions etc.
'PLAYER/MANAGER' - you control your player nearest the ball during the match, and can also manage from the 'dug-out' (not available in this release as it is being worked upon now)
'QUICK RESULT' - allows you to not have to play the 3D game at all, but instead to simply see the simulated result of this fixture
These settings can also be specified in the Team Screen. Once you have made a selection it will remain on this setting for all subsequent matches unless you alter it
Click on PLAY MATCH icon (bottom right hand side) to proceed
The Match!
In all game modes, the matches are played in high quality 3D (unless you have opted for 'Quick Result').
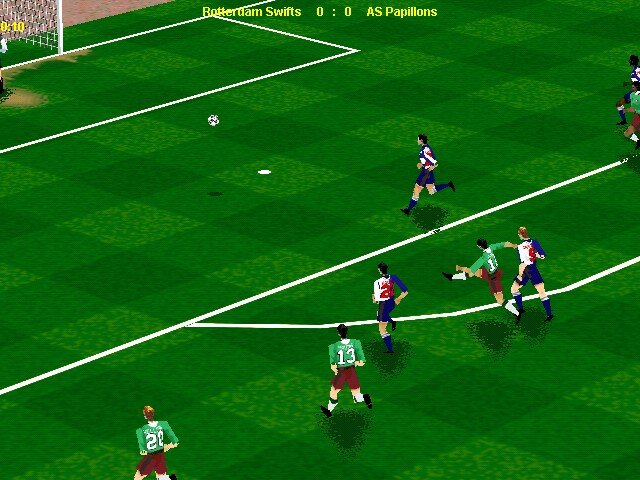
For details of how to control your footballers see Notes On Footballer (Player/Manager) Controls.
When a goal has been scored, there is an automatic replay .
Press ESC to quit the replay and continue the match
Press the minus (-) or plus (+) keys on the numeric keypad to increase or decrease the screen size. The smaller the screen display the faster/smoother the game.
If the game does not appear to function properly, refer to the Troubleshooting / F.A.Q section.
If you selected PLAYER/MANAGER (not available in this release) you now have control of the footballer on your squad nearest the ball. Otherwise you have the MANAGER ONLY controls, which are also available to the PLAYER/MANAGER.
In the top left hand corner of the screen the match time is displayed. In the top centre of the screen the fixture details and scoreline are displayed. The home team is always shown on the left hand side.
Beneath each team, you will also see displayed the name of the current team members in possession of the ball (if any).
A number of management options are available to you while playing a match. These are described below. If you are PLAYER/MANAGER you have these options available in addition to control of footballers on the pitch.
Substitutions
Press SPACE BAR
The current layout of your players will be displayed. Substitutes are listed on the bench in the bottom left hand corner.
To swap a player's position or to substitute a player left click on that players name and then left click on the player with whom you wish to swap him.
Click on DONE or CANCEL or UNDO icons as appropriate
Changing Formation During The Match
Into every match you take four formations. Obviously you only use one of these at a time! The formations can be altered in the Team Screen.

Press SPACE BAR
To change your current formation, move the pointer over the current formation, which is shown in the lower right hand side of the screen.
Click the mouse button and the next formation will be displayed. Each click will display another formation until you have seen all four formations loaded, then they will cycle back from the beginning again.
Every change will cause the players names on pitch to alter to show the new formation.
Click on DONE or CANCEL or UNDO icons as appropriate
Changing Playing Styles During The Match
For every formation you take into the match, you take four playing styles (giving you a total of sixteen playing styles).
The playing styles for each formation can be altered in the Team Screen.
Press SPACE BAR
First, change the formation to the one you require.
Next move the pointer over the playing style, which is shown to the left of the formation. Click the mouse button and the next playing style for this formation will be displayed (remember that playing styles are linked to formations - four playing styles per formation). Each click will display another playing style for the chosen formation until you have seen all four playing styles for the selected formation. They will then cycle back from the beginning again.
Click on DONE or CANCEL or UNDO icons as appropriate
Changing Strategy During The Match
You can alter the overall team strategy using a number of pre-set conditions. These take the formation you have chosen, and force the team to adjust their play by varying the formation setting.
The team strategies are described in, and can be altered in the Team Screen.
Press SPACE BAR
Move the pointer over the strategy setting, which is shown in the bottom right hand corner or the screen, above the DONE icon.
Click the mouse button and the next strategy will be displayed. As with the formations and playing styles, these will cycle through the available choices.
Click on DONE or CANCEL or UNDO icons as appropriate
Reviewing Player Information During A Match
Press SPACE BAR
To select an individual players info right click on the player name.
Info on that player will now be displayed including his playing instructions. To change a players instructions click on the relevant text to toggle through the options available. Any changes you make will last for the duration of the match only, and not long-term. To make long term positional changes, use the STYLE EDITOR
Click on DONE or CANCEL or UNDO icons as appropriate
Statistics About The Current Match
These are snapshots of data about the game at the point in time when you press the relevant key.
F1 for score/goal scorer summary
F2 brings up the match information. Cancel by pressing F2 again
F3 brings up a territory/possession display. Cancel by F3 again
Additional In-Match Options
F2 - Possession data
F3 - Possession data (also activates the Set Piece menu in Practice Mode)
F4 - Pause
F5 - Snapshot of current screen (saved to root install directory as a .BMP file, under the name SNAP0000, each successive screengrab increases the filename by +0001. Note that each time you launch Soccer Nation, the filename resets to SNAP0000, so you should move saved screengrabs from the install directory at your earliest opportunity)
F7 - Replay previous few seconds of the match (see below)
F9 - Camera Mode (see below)
Camera Options And Special Features Available During A Match
Begin by pressing the F8 key:
F8 - Camera Options
Page Up - Move Camera UP
Page Down - Move Camera DOWN
Numbers 1-9 - Select Default Cameras
Numeric Cursor
Keys - Move camera in/out
F7 - Reset cameras
Replays
When a goal has been scored, there is an automatic replay. A small 'R' is displayed in the top left hand side of the screen during replay
Press ESC to quit the replay
To replay the previous few seconds of any game, press the F6 key
Notes On Rules Used In Soccer Nation
Each match will be conducted according to the traditional rules of football. The objective being to score the most goals and thereby win the match. The following features are currently included in a match:
Offside
The computer referee will penalise footballers for straying offside.
Goals
A goal will be scored if the whole of the ball crosses the goal line between the posts and below the bar.
Corners
A corner will be awarded to a team if the whole of the ball crosses the opponent goal line and the last footballer to touch the ball was a member of the opposition.
Throw Ins
A throw in is awarded when the whole of the ball crosses the side line. The throw will be awarded against the last team to touch the ball.
Kick Off
The home team always kicks off the game. The other side will kick off the second half. A team will kick off again after conceding a goal.
Goal Kicks
A goal kick is awarded when the whole of the ball crosses a teams own goal line (which is not the goal itself!), and an opponent was the last footballer to touch the ball
Match Length
A match will last ten minutes of real time split in to two five minute halves.
Cup Matches
If a cup match ends in a draw then five minutes of extra time is played using the 'Golden Goal' rule (that is, the first side to score is the winner). If still no result, penalty shoot will decide the winner
Notes On Footballer (Player/Manager) Controls
In this release the player/manager controls are not implemented, although they will be in the final version.
Match Information
This screen shows us the final score.
Click on DONE.
If you are playing a season, the game will continue from Classified Check
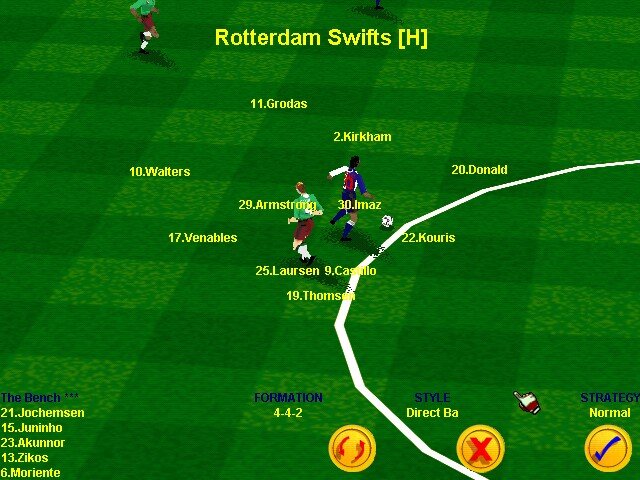
Team Screen

This is the main workbench for you as manager of your team.
At the top of the screen we see the team name.
Below this we see the team manager's name.
Below this in the centre left we see the shirts of your team, in the team's primary colours in the formation you have selected.
In the team list, selected players have a green highlight around their number and substitutes have a blue highlight which matches the subs bench display on the left of the mini pitch display.
In the team list, players that have a red highlight in front of their number are not eligible to play -- a letter within the red box indicates the reason:
i - footballer is injured at this time
l - footballer is on loan to a different club
s - footballer suspended at this time
c - footballer is cup tied (e.g. you have purchased from a
different club, and this player has already participated in a cup game)
p - footballer is in prison!
Below the shirts we see your current team settings that you will take into your next fixture. From top to bottom, these are your formation, playing style, strategy and role you wish to play.
Below the four information columns, there are up arrow buttons. Click on one of these and the player list will be sorted by that selected column. For example, you can list your team by their position number, or by their form (or any other criteria you have chosen as one of the two information columns). Clicking on the sort bar for the first two columns will sort by squad number and by team inclusion (i.e. this will group together all the players in your team) respectively.
The icon, next to the help icon, is the Coach Advice icon. This brings up a further dialogue box. Use these options to have your team Coach automatically determine the settings for your team rather than have to do it yourself!
The icon at the bottom right hand side, just above done icon, is for Set Pieces. This takes you to the Set Pieces Screen
The icon to the left of the done icon is the Club Menu. This will display another dialogue box giving you hot links to other screens including Manager Info, Club History, League Standings, the Kit Editor, Club Fixtures and your Stadium Screen.
Selecting Your Team's Formations For The Next Fixture
You can take four formations into the next fixture. You choose the four you wish to use here.
Click on the formation displayed and it will cycle through the four formations that you currently are taking into the next match. Each click displays the next in sequence.
To load a new formation, select a formation you no longer require then click on the green button next to the formation name.
A dialog box will appear. Click on the down arrow to see the formations available .
Move the mouse pointer to highlight the formation desired and click the mouse button. Click on OK when the box shows the formation you want.
Selecting Your Team's Playing Styles For The Next Fixture
Below the formation is your playing style.
You can have four playing styles for each loaded formation.
This works in the same manner as selecting and changing formations (see above).
Selecting Your Team's Strategy For The Next Fixture
Below the playing style is your team strategy.
There are five settings for team strategy as follows:
Normal - your footballers will follow the formation instructions
Push Up - footballers will push up further than formation instructions when in possession of the ball
Attack - the team will push up when both in and out of possession
Drop Back - when the side lose possession of the ball they will fall back deeper than the given formation instructions
Defend - the team will take up more defensive positions when both in and out of possession
Selecting Your Role In The Next Fixture
Below team strategy are the options that allow you to specify how you wish to control your team in the next fixture.
It is a toggle setting as follows:
Manager - which means you will see the 3D match, but not take control of any players; you make decisions from the bench, including substitutions and changes of strategy and formations that affect your team during the game
Player/Manager - the same as Manager but you also get to take direct control of the footballer on your team nearest to the ball - this option is currently not implemented, but will be in the final version
Quick Result - which means the simulation will skip the 3D game and calculate the outcome of a fixture based upon the opening statistics for the teams in play
Team Attributes
In the centre-right of the screen we can see the entire squad and two columns of statistics about individual player attributes.

You can scroll up or down the team list by pressing the up facing or down facing arrows on the right hand edge of the screen.
All footballers in your team have a unique squad number. You can have a maximum of thirty footballers in your team.
If the box to the left of the number box is red, this player has an injury or there is some other reason that prevents this footballer from playing at this time - see above for details.
Putting Players In Or Out Of The First Team For Next Match
To play in a match you need to have 11 players selected (represented by the shirts on this screen - these are your first 11) plus 5 substitutes (represented by the 5 additional numbers to the left of the shirts).
To swap footballers in and out of the first team, look on the left hand side of the screen and click on the shirt or substitute box that shows the footballer number you want to move out of the first team.
Then on the right hand side of the screen, click on the number of the footballer you want to swap into the first team -- the swap happens instantaneously.
You can also swap footballers from the sub-bench into the first 11 in the same way
You can move first 11 footballers into different positions by clicking on one shirt, the clicking on the shirt you want them to swap with
Displaying Different Footballer Attributes
The two columns next to the player list are information columns that you can alter to show different information as you wish. The defaults are 'Pos' (for position) and 'Form'.
'Pos' shows a playing position on field in coded form (e.g. GK for goalkeeper, S for striker etc.) plus a numbered rating of this footballer's overall ability - the higher the number the better the player. Thus an 'M7' indicates a footballer with statistics which suggest he would be a talented midfield. Some players have statistics which could make them suitable for more than one position and so may have more than one position listed
'Form' is a statement of overall fitness of this footballer compared to his statistics. A low rated player with 'Superb' form simply means that today he is able to play to the best of his ability. He is likely to play worse than a highly rated player who is not on peak form, but is today rated only 'Good'.
To alter the player information shown:
Click on column heading (for example 'Form') and a dialogue box will appear.
This gives you a list of all available information that can be swapped into one of these two columns. By moving the mouse and clicking on an item, this will appear as one of the two columns, replacing the one you originally selected.

The following are all of the available information columns that you can view on the Team Screen:
Position - the optimum playing position(s) for footballers based upon their statistics
Assists - this is the number of goal assists a footballer has achieved this season
Bookings - lists the number of bookings the player has received this season
Contract Length - shows the remaining length of a footballer's contract
Fatigue - lists the footballer's fatigue status
Form - shows how well the player is currently playing in relation to his statistics
Games Played - the number of matches played by a footballer this season
Goals - the number of goals scored by a footballer this season
Morale - a footballer's morale
Rating - the Coach's suggested playing position for a footballer based upon his statistics
Value - the Board's current valuation of a footballer
Wages - the current salary level for a footballer
Statistics - this brings up a further dialog box listing fourteen player statistics, all rated out of 100 where 0 is low and 100 is high, including:
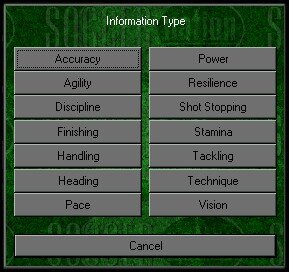
Accuracy - ability to pass and shoot accurately
Agility - initial acceleration and speed of turn as well as a goalkeeper's reaction time
Discipline - how likely a footballer is to commit an error
Finishing - ability to keep his head and make an intelligent decision in goal area
Handling - a goalkeeper's ability to catch the ball
Heading - accuracy with his head
Pace - how fast a footballer can run
Power - how hard a footballer can strike the ball, also affects the speed at which a goalkeeper can dive
Resilience - ability to withstand injuries
Shot Stopping - a goalkeeper's ability to save shots
Stamina - how quickly a player tires
Tackling - ability to succeed in a challenge
Technique - close control as well as advanced manoeuvres such as back-heels, volleys etc.
Vision - ability to select the most advantageous pass to make in a given situation
Player Attributes / Player Info

Click on any player name in your team list and you will see a new screen containing that player's personal information:
At the top of the screen we see the footballer's full name, and below this the name of the team he plays for.
Beneath this we see a number of statistics - at the top half of the screen there are general statistics about this footballer, including:
Age (all footballers age 1 year each simulated season; generally younger players are 'raw' talent, often fitter and more agile than older players, but not as disciplined)
Height
Nationality
Personality (a statistic beyond your control as a manager and which will have a bearing on this footballer's performance on the pitch)
Position (this shows the position (and sometimes positions) that this footballer is suited to based upon his statistics. In addition there will often appear a number which is a rating of this footballer's overall ability - the higher the number the better the player. Thus an 'S7' means a Striker rated 7 by your team coach
Coaching (the current training regime that this footballer is undergoing during the season - coaching has a long term not short term effect on footballer stats)
Condition (a statement of this footballer's current match worthiness)
Fatigue
Form (a statement of how well this footballer is playing compared to his statistics)
Morale
Valuation (the Board's current estimate of the value of this player on the transfer market)
Beneath the general statistics in the lower half of the screen we see a summary of some specific footballer attributes, which will be of particular interest to you as the team manager.

Manager Options
Select the icon at the top left hand side of the screen, to the right of the 'help' icon - 'Manager Options'. This will open a new dialog box listing the actions you can effect with any one of your footballers:
Offer New Contract To Footballer
Select this option from 'Manager Options' and the 'Contract Offer' dialog is displayed. It contains the following:
Wage Demand - the amount this player is seeking in weekly wage (if it has a 'K' after the number it denotes thousands)
Board Limit - this is the maximum salary that the Board will allow you to offer based upon the Club's current finances
Relegation Release - if this says 'Yes' then this footballer will demand to be released from his contract in the event that the club are relegated at the end of the season
Wage Offer - the amount you will offer the footballer; you can increase or decrease this amount using the arrow buttons to the right of the amount
Contract Length - the term of the contract; as a manager you want to secure good talent for as long as possible, but if you want to drop a player, you will have to pay him a settlement based upon remaining contract time at the point you drop him
At the bottom of the 'Contract Offer' dialog box are two buttons - ' Make Offer' and 'Cancel'. If you make an offer, further dialog boxes will appear advising you of the result of your offer.
Put On Transfer List
Select this from 'Manager Options' and the 'Put On Transfer List' dialog is displayed. It shows the current Board valuation of the footballer in question, and below this, the amount you wish to ask for on the transfer market. You can alter the amount using the up/down buttons next to 'Amount'. Click on 'OK' and the player is placed on the transfer list, indicating to other clubs that you wish to sell this player. You can remove a player from the transfer list by selecting this option again.
Put On Loan
Select this from 'Manager Options' and the 'Loan List' dialog is displayed. It confirms that this footballer is now available to be loaned by other clubs, if they pick up his costs for the duration. You can recall a player from loan by selecting this option again.
Release On Free Transfer
Select this from 'Manager Options' and a dialog displays asking you to confirm this action.
This action drops the footballer from your team from this point forward. You will have to immediately make a settlement with him based on his contract, and this will appear in your club finances.
It is a fast method of freeing up squad places for new players if you have reached your maximum of thirty players.
View Contract
Select this from 'Manager Options' and this Footballer's current terms of contract are listed.
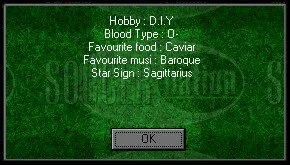
View Hobbies
Select this from 'Manager Options' and personal details about the footballer are revealed.
These bear no major impact on the gameplay, and are provided primarily to reinforce the characters. However, you may learn some useful things about your players here!
Change Coaching
Select this from 'Manager Options' and a dialog box will be displayed - click next to the coaching regime you wish this footballer to follow - it will alter this Footballer's current coaching regime (shown in the top right hand corner of the Player Info screen):
Your options are:
Goalkeeping
Defence
Midfield
Attack
Player History
Select the icon at the bottom right hand side of the screen, and details of this player's past performance by season will be listed.
Inspect Teams
This screen shows in alphabetical order all teams in the game so that you may reference them.
Click on a team to view that team's data
Move up or down the list using the arrow icons
Click on DONE.
Club Finances
This screen shows you your club's current financial statements. It is a 'snapshot' of your club's health at the point in time you look at the information.
Based upon the information shown here, the Board will (or will not) let you undertake certain transactions (such as buying footballers, releasing footballers on free transfer, contracting to build a new stand, installing under-soil heating etc.). Typically the Board will set an upper limit for you to work within, based upon the 'bottom line' - the Cash Available (the very bottom line of this screen).
Across the page from left to right are columns of information, starting with the overall descriptions of your financial affairs, then data for this week (so far) , data for this season (so far), and the total of your affairs for last season as a reference.

Income
Your club's financial income (up to the current season date), shown in the top third of the screen data:
Commercial Receipts
This is a summary of income that has been received by your club through commercial exploitation (e.g. sponsorship, magazines, merchandising etc.). Quite simply, the better your team performs, the more valuable your players become, the greater the commercial receipts you can expect.
Gate Receipts
This is the money you take at your ground from ticket sales, or that you receive from away matches
Transfer Income
Monies received by your club from other clubs by way of the fee payable to you on the sale of a footballer
Total Income
The total of all the income listed above
Expenditure
Your club's financial expenditure (up to the current season date), shown in the middle third of the screen data:
Player Wages
The wage bill for your squad; a total of the individual wages you pay your footballers . The more you pay individual footballers, the bigger your wage bill!
Running Costs
This is a total of the other costs you incur running your club, including ground staff, management, security, and ground maintenance. Quite simply the bigger your stadium and club, the more your running costs
Stadium Construction
If you have chosen to build a new stand on the 'Stadium' option, the costs of this building will be shown here
Transfer Fees
The total of the fees you pay to other clubs for players you are buying from them, and the cost you pay to individual footballers if you are releasing them on a free contract, if any
Youth program
Depending upon the amount you have put into developing your youth squad on the Team Screen, you will see the costs of this reflected here. These are the costs of scouting, testing, trialing etc.
Total Expenditure
The total of all the expenditure items, above
The Bottom Line
Your club's overall health status (up to the current season date), shown in the bottom third of the screen data:
Gross Profit
Income to date less expenditure to date
Profit After Tax
Payable at the end of season, if you have made a profit you have to pay a percentage to the authorities
Bank Balance
Last Season's closing Bank Balance (right hand side of page on this line) plus the Gross Profit figure
Cash Available
The amount of money (if any!) overall that the Board will release to you for spending on building the club. This is the bank balance less an estimate by the Board of the typical expenditure you are likely to incur in the immediate future.
Click on DONE.
Establishing A Youth Team

At the top left hand side of the screen, to the right of the help icon, is the 'Youth Training' icon.
Click on this icon, and you are given the option to hire one or more talent scouts, and the option of establishing a School Of Excellence.
Scouts, and the School of Excellence, will improve the quality of younger players coming into your squad over time. But, there are costs associated - the more you want, the more it will cost you!
As you make changes in the 'Youth Program' dialog box, the financial costs are shown as 'Running Costs' at the bottom of the dialog box.
View Stadium
At the top of the screen we see our team name. Below this we see the name of the ground where the stadium is built. Beneath this we see the current capacity and the average league attendance this season.
We also see a birds-eye view of the stadium.
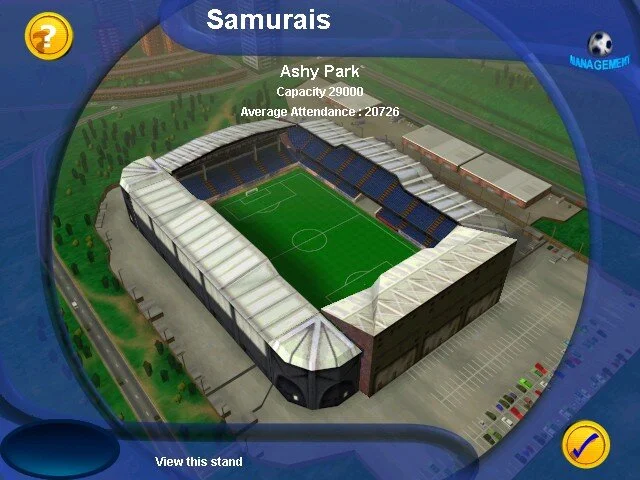
If you click on the pitch you are given the option of installing under-soil heating.
If you click on any one of the four stands in the stadium, you see a close up of that stand and the current capacity. You can elect to build a new stand here by clicking on the arrow icons at the bottom right hand side. This will change the image shown on screen to show the proposed new stand, the new capacity, the cost of developing the new stand, plus a statement of your available cash.
To buy the stand, click on the icon at the top left of the screen next to the help icon. If you cannot afford to buy the stand a dialog box will be displayed with an appropriate message from the Board.

Assuming you can afford to build a stand, you will see a building site appear on the birds-eye view of your stadium. The building site will also appear within the 3D match from now on, and for the rest of the season. This will result in a reduced capacity overall for the duration, but increased as of next season, when the new stand will feature thereafter.
Click on DONE.
League Table
This shows the league table standings for your division. You can use the arrow icons at the top left hand side to move through divisions.
Click on DONE.
Inspect League
This allows you to select the division that you wish to see (from the League Structure Screen) and then to review the league from the League Table screen.
Move between selection criteria by using the icons
Click on DONE.
League Attendance
Displays the average, highest and lowest attendances for each club in your division. You may review other divisions by using the arrow icons at the top left hand side of the screen
Click on DONE.
League Form
This screen displays your recent results in your division. You can use the arrow icons at the top left hand side to move through divisions.
Click on DONE.
Manager Info
This screen shows you pertinent information about you as the manager of your team. The screen is also used in other circumstances to display information about other managers. The name of the manager being viewed is displayed at the top of the screen.
Move between selection criteria by using the icons
Click on DONE.
Manager Rankings
The screen shows you a list of all managers in the game ordered according to their success. You have a number of criteria with which to view such success.
Move between selection criteria by using the icons
Click on DONE.
Competition Fixtures
This screen allows you to view the fixtures and results for the various competitions in the game. You can move through the divisions and competitions by using the arrow icons at the top left hand side of the screen.
Click on DONE.
Club Fixtures
This screen allows you to view your club's fixtures and results for the season.
Move between selection criteria by using the icons
Click on DONE.
Club History
This screen alllows you to review your club's League History, Cup History, Previous Top Scorers, Stadium Attendance History, and Club Records.
Move through these by using the arrow icons at the bottom right hand side of the screen.
Click on DONE.
Club Records
This screen displays the league records for such matters as All-time Record Victories etc. for clubs.
Move between selection criteria by using the icons
Click on DONE.
Player Records
This screen displays all time league records for player-related items such as Record Transfers, Most Goals in a game etc.
Move between selection criteria by using the icons at the lower right hand side of the screen
Click on DONE.
Competition History
This screen allows you to view the previous winners and runners up in the various game competitions.
Move between selection criteria by using the icons
Click on DONE.
Replays
This option will provide a sophisticated system to review pre-recorded matches.
In this release it will display your previous match.
Video Wall
This function allows the consumer to view advertisements from sponsors.
Click on a sponsor logo to see their commercial
Click on DONE.
Annual Awards
Allows you to view the previous season's annual awards
Move between selection criteria by using the icons
Click on DONE.
Player Awards
Displays previous winners of World Footballer Of The Year, Young Footballer Of The Year, Footballer Of The Year, and the Top Goal Scorers for the four divisions.
Click on arrow icons to move between them
Click on DONE.
Manager Awards
Allows you to view previous winners of manager of the year and previous seasons manager of the month.
Move between categories by using the arrow icons on the bottom right hand side
Click on DONE.
Kit Editor
This screen allows you to customise the colours and style of the kit your team play in during the match.
On the centre right hand side, you see a large image of a typical player wearing one of the three kits you can alter.
On the centre left hand side you can see three miniature footballers - the top one sports your first kit, the middle the second kit, and the lower your third kit.

The team will always wear the first kit in preference to others unless there is a clash of kit with an opposition team, in which instance either the second or third kit will be selected automatically.
Icons and functions:
Clicking on one of the mini kits will select that kit for editing.
Clicking on the relevant portion of the selected kit will select that portion of the kit for editing. For example, click on the shirt of the main footballer. You can alter the design of the shirt by clicking the green arrows in the big blue circles either side of the shirt. You can change the colour of the shirt by clicking on either the up or down arrows at the very right hand side of the screen. The same applies to shots and socks.
Note that the second and third kits will automatically alter to avoid kit clashes
Click on DONE.
Team Practice
This option has been disabled in this release, while it is finalised.
The following options describe what will occur in the final release, for your reference:
The purpose of this screen is to allow you to practice set-pieces including a practice match against your own squad - they will wear bibs over their shirts.
In this release the training ground is not used but it will be in the final release.
F3 brings up set piece options: you can select corner free kick or penalty. The overlay screen shows a map of the pitch.

Corner
Select the word CORNER then select a corner at either the 'Defend' or 'Attack' end of the pitch displayed. The team will play a corner from this point on the pitch. 'Defend' will always be the nominal opposition team rather than the one you have control over.
Free Kick
Select the word FREE KICK then select any place on the overlay pitch and click. Your team will play a free kick from this point if a free kick is selected in the Attack area, or the opposition will take the free kick.
Penalty
Select the word PENALTY and click either the Attack half (for your penalty) or the Defend half (to practice saving).
Click on DONE then ESC to exit.
Match Editor
The purpose of this menu is to allow the consumer to customise match settings such as match length, referee, skill level, commentators etc.
Management Editor
This feature allows you to configure the management options so that you only are required to manage those elements of the simulation that interest you.
Set Pieces
The purpose of this screen is to order your squad according to how you wish to take penalties and free-kicks.
You can also set-up the spread of free-kicks and corners that you would like the team to take.
Click on DONE.
Playing Style Editor
The purpose of this utility is to construct personalised playing styles for your squad. The sum of the individual playing instructions for each team position comprise the team's playing style.
At the top of the screen we see the currently selected formation with the current playing style stated below.
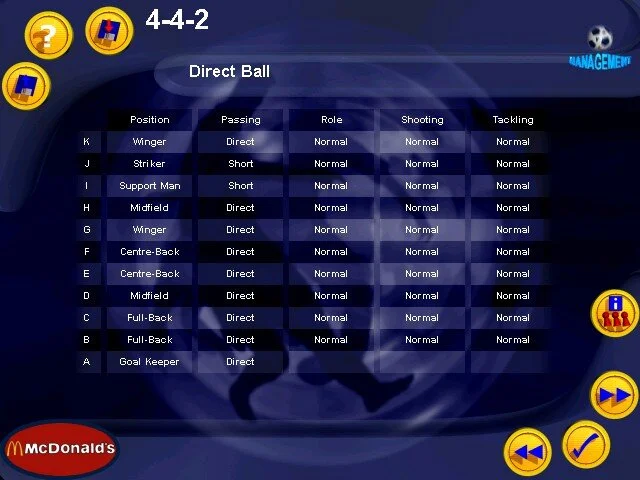
We see on screen the eleven positions in your team represented by the numbered column on the left hand side. Next to these there are five columns of instruction categories. You can alter these to show different mixes of categories from a total of ten, plus a column showing positional description.
To view additional categories, you can move left/right through them by clicking on the arrow icons at the lower right hand side of the screen.
There are load and save icons at the top left of the screen, these can be used to alter other playing styles for formations.
To alter an individual playing position's instructions, click on the number for the shirt/position to be altered (see below)
Altering A Playing Position Instruction
You will now see the player number at the top of the screen and two columns:- one showing instruction, the other selection.
To alter an instruction, click on the selection for that instruction - it will alter.
Click again and you will see another. Keep clicking until you see the instruction you want.
The selections and their respective instructions are as follows:
Position: A description of the playing position for this shirt number
Winger - plays wide on left or right in a midfield or attacking role
Midfield - plays in a centre-field position
Midfield-General - a mid-fielder with play-making responsibilities
Anchorman - plays as a deep lying mid-fielder in front of the defence
Libero - operates as a sweeper behind the defence with freedom to push forward when team are in possession of the ball
Full-Back - plays wide on left or right in a defensive role
Centre Back - plays in centre of defence
Sweeper - plays as a last line of defence
Striker - forward player with responsibilities for goal scoring
Support Man - deep lying striker who plays in the hole between mid-field and attack
Passing: The nature of pass to be played predominantly by this position
Long - hits long balls upfield into opposition area
Direct - plays positive attacking passes whether long or short
Short - positive passes of a short nature with accent on retention of possession
Cautious - safe passes, may frequently result in sideways or back-passes
Role: Defines the overall function within team
Feeder - looks to pass to team mates with play-maker instruction in preference to other players
Play Maker - acts as a focus for team play
Normal - neither feeder or play maker
Shooting: Dictates whether a player is likely to try long range shots
Normal - no specific shooting instruction, will play according to his personal stats
Long - prone to shoot from long range
Tackling: Commitment on challenges for the ball
Hard - more likely to slide tackle
Cautious - less sliding tackles
Normal - no specific instruction will play according to his personal stats
Dribbling: Will influence how frequently footballer will take on opponents
Flair - will tend to take on opponents
Cautious - will rarely attempt to take on opponents
Normal - no specific instruction will play according to his personal stats
Wing: Influences a footballer's dribbling when he finds himself in a wide position
Outside - more likely to attempt to run outside an opponent and dribble for the by-line
Inside - more likely to cut inside his opponent
Normal - no specific instruction will play according to his personal stats
Width: Dictates how wide a player positions himself in relation to normal formation instructions
Wide - will play wider than normal
Tuck In - plays more centrally
Normal - no specific instruction will play according to his personal stats
Attack: Influences the players tactical position when his team are in possession of the ball
Push Up - will play further forward than is normal
Drop Back - will play deeper than usual
Normal - no specific instruction will play according to his personal stats
Defend: Influences players tactical position when opponents have possession of the ball
Push Up - will play further forward than is normal
Drop Back - will play deeper than usual
Normal - no specific instruction will play according to his personal stats
Support: Dictates whether the player is available to make supporting runs outside his normal position within the formation
Yes - he will make supporting runs
No - he will never drift out of formation
Click on DONE. This returns you to the Playing Style Editor.
Formation Editor
The Formation Editor can be used to build new formations or edit old ones.
The display shows the pitch split into forty boxes.
A large ball represents the position of a real ball in a fixture. You can drag the ball to different positions.
The footballers' shirts represent your team's playing positions, and where you want your footballers to be when the real ball is in the position indicated by the large ball in the formation editor.
Move the pointer over the large ball and press the mouse button, keeping it pressed down
Drag the ball in a circular fashion around the pitch - note how the team moves. This movement is the formation
Release the ball
Now click on a shirt and press the mouse button
Drag the shirt to the next square and release the mouse button. You have now moved this playing position in the formation, so the footballer wearing this shirt would move differently as a result of this change.
By moving players relative to the ball position, you create (or edit) formations.
The Ball
The ball can be moved from one pitch box to another by clicking on it and releasing it over the box desired. The changing positions of the footballers will be indicated as you move the ball.
Footballers
The footballers are represented by numbered shirts on the pitch. The pink shirts (the default setting, also selected by pressing the Attack Icon) represent the positions of the footballers when their team are in possession of the ball. The blue shirts (selected by pressing the Defence Icon) represent the positions the footballers take up when the opposition are in possession of the ball. A shirt can be picked up and moved by clicking on it and dragging and dropping it in the desired location. Your goalkeepers shirt cannot be moved.
Attack Icon
This is the first icon at the top left hand side of the screen beneath the help icon. When this icon is selected the playing positions of your footballers are displayed for when your team is in possession of the ball; your team represented by pink shirts.
Defence Icon
This icon is below the Attack Icon. When this icon is selected the playing positions of your footballers are displayed for when your opposing team is in possession of the ball; your team represented by blue shirts.
Movement Trace Icon
This icon is below the Defence Icon. When this icon is depressed an additional ghost ball appears on the pitch. This new ghost ball can be moved around in the same manner as the main ball.
The idea is that if the main ball were to move to the position of the ghost ball, then the lines that get drawn indicate the distance that each footballer would have to move. This will help you identify how realistic the instructions you are giving your team through your formation are: the bigger and thicker the lines, the harder the run required.
Copy Icon
This icon is below the Movement Trace Icon. When this icon is depressed the current positions of the footballers can be copied to a new box by moving the copy ball to the box in question.
Corner Icons
This icon is highest up the top right hand side of the screen, and also the icon immediately below. These represent the left wing and the right wing corner posts. Using these in conjunction with the Attack and Defence Icons you can set-up attacking and defensive corner scenarios. The footballer positioned nearest to the corner flag will take the corner.
Kick Off Icon
This icon is below the Corner Icons. This allows you to set-up kick-off positions. Again, this can be used in conjunction with the Attack and Defence Icons.
Goal kick icon
This icon is below the Kick Off Icon. When this icon is depressed you can set up your footballers' positions for when the goalkeeper kicks the ball out. Again, this can be used in conjunction with the Attack and Defence Icons.
Free kick Icon
This icon is below the Goal Kick Icon. When this icon is depressed you can set up your footballers positions for free kicks. Free kicks are only set up for the pitch boxes directly around the penalty area. Again, this can be used in conjunction with the Attack and Defence Icons.
Footballers who are to form the defensive wall should be placed in the wall box that appears at the top of the screen for defensive free kicks.
Similarly a box will appear for attacking free kicks. One or two footballers must be placed in the free kick takers box when setting up attacking free kick positions.
Load
This icon appears near the top of the screen, below the formation name. It is one of a group of five icons and of these is the left-most icon. By clicking on this icon the you can load a new formation in to the editor
Save
This icon appears to the left of the Load Icon. By clicking on this icon you can save the current formation to disk. You can also rename the formation.
Zoom
This icon appears to the left of the Save Icon. When this icon is depressed you will be presented with an enlarged view of the pitch and the footballers positions. You can scroll around the pitch by clicking on it and dragging it across the display.
Undo/Redo
These icons appear to the left of the Save Icon. By clicking on these icons you can undo any previous actions or redo any undone actions as you see fit. Actions can only be undone to the point of the last save.
Player Standings
Allows you to review the current relative player standings for such things as Goals Scored This Season, Assists, Worst Discipline etc.
Use the arrow icons at the bottom right hand side to move between the categories, and the arrow icons at the top left hand side to move between the divisions.
Click on DONE.
Scout Search
Scout Search Criteria
At the top of the screen is your team name, and beneath this the word 'Scout Search'.
This option allows you to set-up the criteria that you want the Soccer Nation scout to use. The scout's job is to search the Soccer Nation player database and find players that meet the criteria you set. You would use this to find new talent for your team.
On the left hand side of the screen are listed 14 footballer playing statistics. To the right of this list is a box with a + and - symbol either side.
By clicking on the + or - symbol the figure between the symbols will increase or decrease. This sets the minimum value you wish the scout to use in the search (for example if you set a value of 45 for the Accuracy, the scout will only report back with players who have an accuracy stat equal to or greater than 45).
Next right across the page are a list of further criteria, these are also toggled using the + and - keys either side.
Minimum Age - the minimum age for footballers you wish to consider
Include Injured
Yes - list footballers currently injured
No - do not list footballers currently injured
Specific Position
S - Striker
M - Midfield
W - Winger
CB - Centre Back
FB - Full Back
GK - Goalkeeper
Minimum Rating - the minimum coach rating you will consider
Recommended Only
Yes - only consider your coach's recommended players
No - means include players not recommended by coach
Transfer Status
Listed for Loan - only footballers currently placed as available for loan by their club
Out of Contract - only footballers currently not under any contract
Free Agent - only footballers out of contract and not currently at any club
Transfer Listed - currently on the transfer list by their club
All Players - consider everyone regardless of transfer status
Maximum Price - the maximum you are prepared to pay for any footballer meeting the criteria you are setting
The icon at the top right hand of the screen is to reset the Scout Search criteria.
Click on DONE.
Scout Search Results
On screen we see the first twelve players in a list down the left hand side of players that meet the scout search criteria that you have set.

You can see further players by moving up or down the list using the arrow icons at the top left hand corner of the screen.
Next to each name are the columns displaying age, position, rating, club, division and price. By clicking on the up facing arrows at the bottom of the columns they will sort the listed data by that column. The more players you have in the list, the longer the time it will take to sort and manipulate the scout data.
At the very right hand edge of the list next to each name you will see one of the following letters, each of which has the following meanings:
T - footballer has been transfer listed by his club
L - footballer has been made available for loan by his club
N - footballer is not listed for either transfer or loan
By clicking on the icon next to the help icon at the top left hand side of the screen you are moved to the Scout Search Criteria screen.
Click on DONE.
Short List
This works in a similar manner to the Scout Search but only deals with players that you have determined for Short list on the Player Info screen.
Click on DONE.
Configuration
This feature allows the user to configure their hardware for optimal game performance (e.g. hardware acceleration options, reduced detail level etc.)
Click on options to suit your system
Click on OK
Quit
Select this option to return to the Select Game Type screen.
Load / Save
Allows you to save and name the current game status so that you can load it back in at a future session to continue where you left off, or to load a previously saved game